
It was somewhen mid summer in the last year, on one of those worryingly seldom days that I tried to give my best at the gym on a cross trainer and finally do something for a healthier life (as a student + software developer – you can image how it must have looked like), when I first took a glance at the Dune trailer on the TV which was hanging far from my station. Without any glasses in my face, short-sighted me tried to see it pretty hard while doing the old ‘narrow your eyes till nearly closed zoom-in’-trick (without any success of course) and thought to myself: “Wow – those blurry pixels look interesting”
So when I got home after the training, while convincing myself that I’ll do this more often in the next time (and I mean the training part – not the looking at a TV in a gym like a weirdo part), I watched the trailer again and then thought: “Wow – those sharp pixels look interesting”. I didn’t want to hype myself too much as it would only leave a dark void withing my heart when the movie was not going to be as good as I imagined (you probably know the drill).
After forgetting about the whole thing again for a month or so, I decided to go and watch the movie with someone dear (I needed to have a shoulder to lean on, if the movie was going to be bad). But I must say, to my surprise more or less, the movie killed it for me! And now I have it… I’m certainly hyped for the next part. But what can I do now to express my hyped-ness so that it won’t eat me from the inside one day only to make a hype-monster out of myself? My answer to this question can be answered with one word: make something artsy about it. Here’s the result:
If you’ve seen the movie, you probably also remember this floating wheel of hot stuff from one of the earlier scenes. I did some research (I googled it) and found that it is something they call a ‘glowglobe’. I don’t know if it is extremely relevant throughout the whole story of the universe that the movie plays in (or the book from which it originates), but I found it really fancy, so I decided to recreate my own glowglobe in blender.
I did not find many reference images on the net though, only this page of the dune wiki where we can also see an image from the movie: https://dune.fandom.com/wiki/Glowglobe. This helped me to plan the model.
Glowglobe in Blender – Modelling
After I sketched the structure I started making the base model. The tutorial videos bellow will show you how to make it, but have no sound, so turn on some funky electro-swing music or whatever you are into before starting them.
After I had the base, I continued to model the inner structure:
Then I connected the inner part with the outer shell (the next video is overly detailed with every tiny step included – so increase speed to your liking or just jump to the specific parts):
Shading / Materials
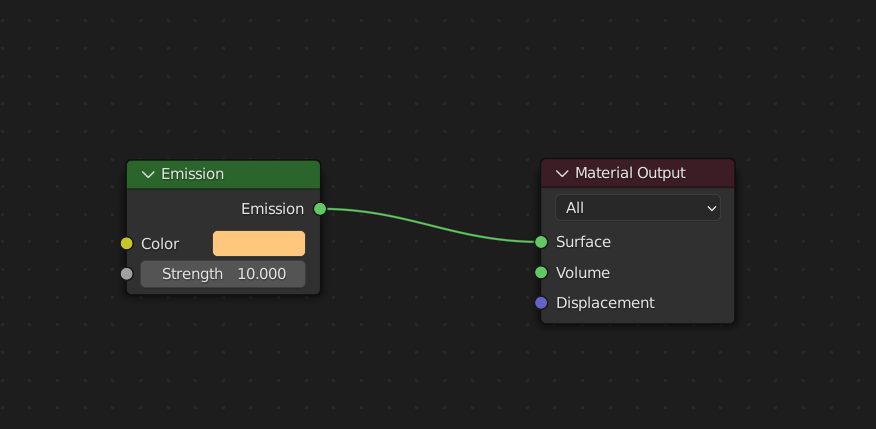
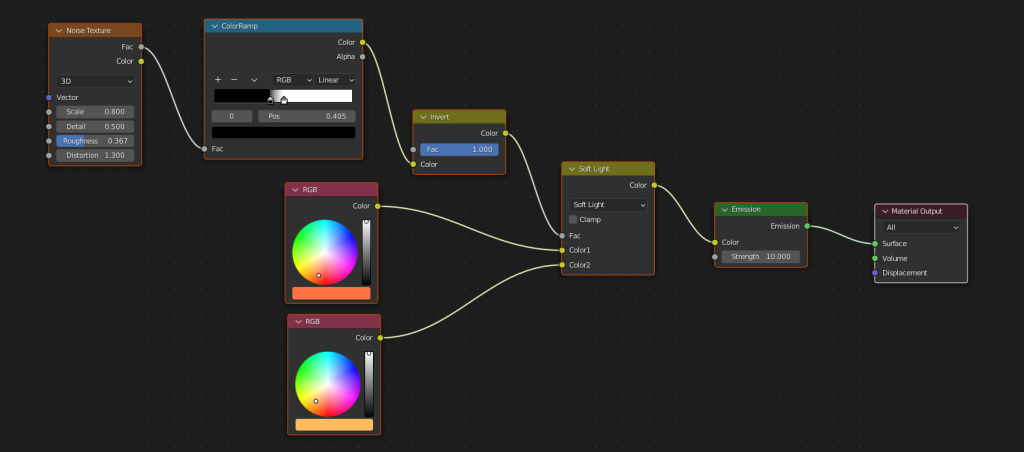
Now the result just looks like some fancy looking car-tire. So let’s improve it! The material of the “frame” is basically just some black diffuse shader. Here are the other Materials that I made for the light emitting parts (the inner and the outer shell) for you to copy:
Assign the materials to the model like in the following video:
After setting up the scene with a house-atreides-like pavement and a dense fog, this is the result:

Let me know what you think of it in the comments or let me know if something is unclear. Enjoy your new glowglobe model!